Cauliflower
Cauliflower (Brassica oleracea) is an important vegetable grown widely in India. The edible of cauliflower is known as “Curd”, consists of a tightly packed shoot system with short internodes, branch tips, and leaves. It is valued for its rich protein content and its unique ability to preserve vitamin C even after being cooked. It is loaded with vital minerals like potassium, sodium, iron, phosphorus, calcium, and magnesium.
Season-
| Maturity Group | Sowing Time | Transplanting Time |
| Early | May end-June end | Mid July |
| Mid- Early | July End | September Beginning |
| Mid- Late | Aug end | September end |
| Late | September end- Mid October | October end- Mid nov |
States of Cultivation-
Uttarakhand, Uttar Pradesh, Bihar, Karnataka, Himachal Pradesh, Haryana, Rajasthan, Gujarat, Odisha, Maharashtra, West Bengal, Assam are the producing states of Cauliflower in India.
Cauliflower can thrive in variety of climatic conditions from temperature to sub- tropical. Young cauliflower plants grow best at an optimal temperature of about 23°C, while mature plants prefer a range of 17-20°C. Tropical varieties can continue to develop even at temperatures as high as 35°C. In temperate climates, the growth of seedlings may slow or stop when the temperature persist just above 0°C. However, early-maturing varieties grown in the plains of North India and other tropical areas can tolerate temperatures of 35°C or higher. For the transition from the vegetative stage to curd formation, temperatures between 5°C and 28-30°C are ideal. If the temperature deviates too far from the range needed for curd development, physiological issues such as “riceyness,” leafy curds, or blindness may occur. Rainfall of about 100-120mm is sufficient for its growth.
Cauliflower can be cultivated in various soil types, provided they are fertile and have a good nutrient balance. In lighter soils, plants are more vulnerable to drought, making sufficient moisture supply crucial. Light soils are typically favored for early crops, whereas loamy and clay loam soils are better suited for mid-season and late-maturing varieties.
Seed Rate-
| Maturity Group | Seed Rate |
| Early | 600-750 gm/acre |
| Mid-Early | 500 gm/acre |
| Mid-Late | 400 gm/acre |
| Late | 300 gm/acre |
Seed Treatment-
Seeds should be treated before sowing to prevent any potential diseases and ensure healthy plant growth. Dip the seeds in hot water in 50oC for 30 minutes or else dip the seeds with Streptocycline @0.01gm/L for 2 hours. To prevent fungal disease, treat the seeds with Carbendazim 50%WP @3gm/kg of seeds. Seeds can also be treated with Bavistin or Thiram @2gm/kg of seeds.
The field should be plowed thoroughly, usually 2-3 times, to a fine tilth. Deep plowing is recommended to break up compacted layers and allow for better root penetration. After plowing, harrowing should be done to further break up clods and smooth out the soil surface, ensuring an even texture. The land should be leveled after plowing and harrowing to ensure uniform water distribution and reduce the risk of waterlogging in low areas. Incorporating well-decomposed organic manure, such as compost or farmyard manure (FYM), at the time of land preparation improves soil fertility and structure. Additional basal doses of chemical fertilizers can also be applied based on soil testing.
Propagating Cauliflower is usually done from seeds. Since, Cauliflower is a biennial plant it does not lend itself for well propagation through cuttings and vegetative propagation. Seeds should be sown first in nursery and then they should be transplanted.
Preparing Nursery-
Firstly, clean the nursery bed by removing weeds, stones, or any debris. Loosen the soil to a depth of at least 6-8 inches. Mix in organic matter like compost or well-rotted manure to enrich the soil. This improves soil structure, fertility, and water retention. If your soil has drainage issues or is too compact, consider building raised beds for the nursery. Raised beds improve drainage, make it easier to manage soil quality, and protect seedlings from ground-level pests. A typical raised bed should be about 8-12 inches high and 3-4 feet wide, allowing easy access from all sides without stepping on the soil.
Sow the seeds directly into the prepared nursery bed about ¼ to ½ inch deep. Water the bed gently after sowing to moisten the soil. Keep the soil consistently moist but avoid overwatering, as cauliflower seedlings are sensitive to waterlogging.
Transplanting-
Once your cauliflower seedlings are 4-6 weeks old and have at least 4-5 true leaves, they are ready to be transplanted into the main field. Space the transplants about 18-24 inches apart in rows that are 24-36 inches apart to allow enough room for mature plants to develop heads.
Irrigate the cauliflower immediately after transplanting. The frequency of irrigation depends on weather conditions, soil type and variety of cauliflower. In Summer, irrigate every 7-8 days and in winter irrigate in 10-15 days. It requires regular water supply during growing and curding stage.
Fertilizer requirement (kg/acre)-
| Urea | Single Super Phosphate | Muriate of Potash |
| 110 | 155 | 40 |
Nutrient Requirement-
| Nitrogen | Phosphorus | Potassium |
| 50 | 25 | 25 |
Apply well decomposed Farm Yard Manure @40 tonns/acre in soil along with Nitrogen @50kg/acre in the form of Urea, Phosphorus @25kg/acre in the form of Single Super Phosphate and Potassium @25kg/acre in the form of Muriate of Potash. Apply whole quantity of Farm Yard Manure, SSP and MOP and half dose of Urea before transplanting.
To promote better curd formation and ensure a high yield, apply a water-soluble fertilizer (19:19:19) at a rate of 5-7 grams per liter of water during the initial growth phase. Around 40 days after transplanting, spray a mixture of 12:61:00 fertilizer at 4-5 grams per liter of water, along with 2.5-3 grams of micronutrients and 1 gram of boron per liter. For improved curd quality, apply 13:00:45 water-soluble fertilizer at 8-10 grams per liter during the curd development stage.
For effective weed control, apply Fluchloralin (Basalin) at 800 ml in 150-200 liters of water before transplanting, followed by hand weeding 30-40 days after transplanting. Additionally, apply Pendimethalin at a rate of 1 liter per acre one day before transplanting the seedlings.
- Nitrogen-
Symptoms-
The most common symptom of nitrogen deficiency can be seen on older leaves of cauliflower. They started turning yellowing.
Curative Measures-
Use Nitrogen rich fertilizer such as Ammonium nitrate, urea or organic fertilizer. Plant cover crops such as legumes, clover, peas or beans.
- Phosphorus-
Symptoms-
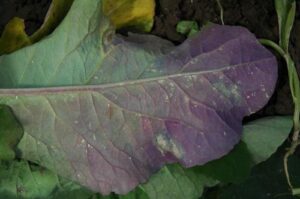
Older leaves are pale bluish green with purple discoloration. Leaves may turn brown and die.
Curative Measures-
Use Phosphorus rich fertilizers.
- Potassium-
Symptoms-
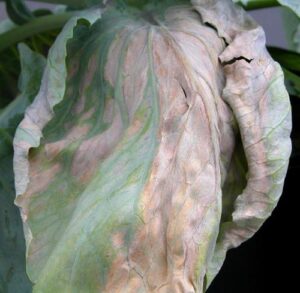
Leaf margins turn yellow to light brown, later brown in color. As the condition worsens, leaves curl up and are less waxy.
Curative Measures-
Use slow-releasing fertilizers such as Potassium silicate or sulfur polymer coated potassium products. Before sowing incorporate potassium fertilizer into the soil.
- Calcium-
Symptoms-
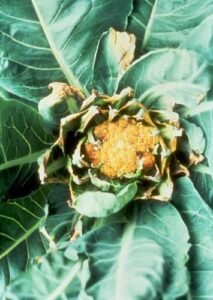
Necrotic leaf margins and clawlike structure can be seen on cauliflower. Deformation of young leaves. In severe condition, curd may die off.
Curative Measures-
Use calcium containing fertilizer such as calcium nitrate or gypsum. You can also use liquid foliar fertilizer with calcium nitrate or calcium chloride. Add organic matter to the soil such as bone meal, dolomite lime or eggshells.
- Magnesium-
Symptoms-
Symptoms usually starts from older leaves as chlorosis from veins to the margins of the leaves. In severe conditions necrotic spots occurs between the veins. Older leaves are stiff and prematurely die off.
Curative Measures-
Use Magnesium sulfate or dolomite lime to correct the deficiency. You can also use magnesium nitrate.
- Sulphur-
Symptoms-
When a deficiency occurs, chlorosis initially appears in the younger leaves and eventually affects the older ones. The leaves uniformly turn pale green or yellow. Initially, only narrow petioles may form. Later, the affected leaves begin to wither and curl inward as the condition worsens.
Curative Measures-
Apply sulfur based fertilizer to treat sulphur deficiency.
- Copper-
Symptoms-
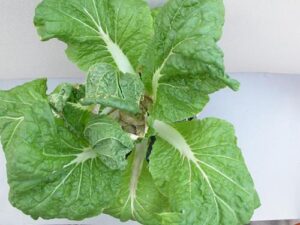
Affected plants show chlorosis and expand to mature leaves. Heart necrosis occurs due to its deficiency. Plants show stunted growth.
Curative Measures-
Apply copper based fertilizers. Lower soil pH.
- Boron-
Symptoms-
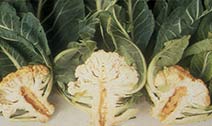
The first symptoms are seen in younger leaves, which stay small, stiff, and pale green. The edges of these leaves become reddish or brown. Older leaves tend to curl downwards and may show reddish tint or signs of chlorosis. Curds develop slowly, leading to the formation of light, underdeveloped curds.
Curative Measures-
Use Boron fertilizer such as Borax, Boric acid to treat boron deficiency.
- Zinc-
Symptoms-
Zinc deficiency symptoms firstly appears on young leaves as they turn small. Another common symptoms occur as yellow or white tissue between the veins while other remain green. It can also reduce plant growth, including shorter stems and smaller leaves.
Curative Measures-
Use zinc containing fertilizer such as zinc oxide, ZnSO4 to cure its deficiency.
- Iron-
Symptoms-
Yellowing of younger leaves are the primary symptom of iron deficiency. In the initial phase of symptom leaf laminas become chlorotic while the vein remain green.
Curative Measures-
Foliar treatment with chleated iron can cure iron deficiency symptoms.
- Manganese-
Symptoms-
The tissue between the veins becomes yellow, while the veins retain their green color, giving leaves the netted appearance.
Curative Measures-
Apply ammonium sulfate or manganese sulfate as a foliar spray to treat its deficiency.
- Buttoning-
Caused by- This disorder can be caused due to several reasons but mostly it cause due to nitrogen deficiency. Other reasons being high temperature, insect-pest activity, planting issues, water issues.
Symptoms-
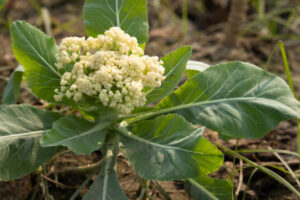
This disorder in cauliflower is characterized by the formation of a small curd or “button” while the plant is still small, leading to an open curd. It occurs due to nitrogen deficiency, planting seedlings older than 6 weeks, or other factors that hinder the plant’s growth during the early seedling stage.
Management-
- Give proper irrigation to the crop.
- Avoid overfeeding.
- Plants from extreme temperature.
- Harvest when the heads are firm and tightly packed.
- Ensure proper nitrogen level.
- Browning-
Caused by- caused due to boron deficiency.
Symptoms-
Browning symptoms can be seen externally on plants. First sign are water soaked spots on leaves, curd surface, which later turn darker and rusty brown in color.

Management-
- Grow self-blanching variety
- Remove affected plant parts from the field and maintain field sanitation.
- Avoid excess moisture.
- Apply Boron rich fertilizer to overcome boron deficiency if there is any.
- Whiptail-
Caused by- Caused due to deficiency of Molybdenum
Symptoms-
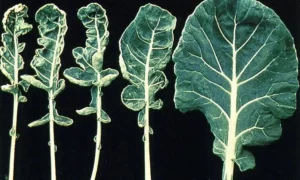
Under this condition, leaf fails to develop properly, instead become strap-like in shape. The growing points of the plants are severely deformed, preventing a formation of marketable curd. Young leaves exhibit noticeable distortion, characterized by elongated mid-ribs and poorly developed, ragged blades. These symptoms indicate a significant developmental disorder affecting the plant’s ability to produce healthy and marketable curds.
Management-
Adjust soil pH through liming. Apply 1-2kg per acre of sodium or ammonium molybdate.
- Hollow Stem-
Caused by- Caused due to Boron Deficiency.
Symptoms-
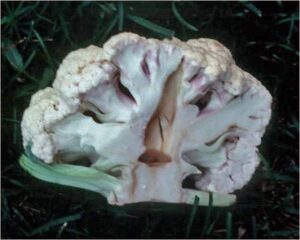
The inner stem tissue shows minor, oval cracks.
A lack of boron can lead to the internal stem tissue becoming discolored, turning either brown or black.
Management-
- Plant resistant varieties.
- Keep nutrients at recommended level and avoid excessive growth rates.
- Give regular irrigation to the crop.
- A lack of calcium can also contribute to hollow stems. If your soil is deficient in calcium, add calcium supplements like gypsum or lime to help strengthen the plant’s tissue.
- Avoid planting cauliflower during periods of extreme temperature fluctuations, as rapid changes in temperature can stress the plants and lead to irregular growth, which might cause hollow stems.
- Riceyness-
Caused by- Premature development of flower buds
Symptoms-
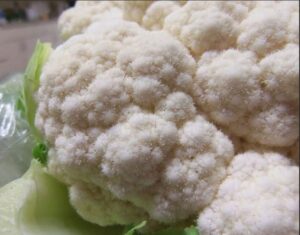
- The buds emerge, extend, and gradually move apart.
- The curd starts to loosen and appears more granular.
- The head looks irregular and has a velvety texture, with flower structures starting to emerge through it.
- Curd becomes unmarketable and of poor quality.
Management-
- Avoid growing cauliflower during warm temperature.
- Plant varieties at correct time.
- Maintain even soil moisture. Avoid both waterlogging and drought. Regular, moderate watering helps support steady growth and prevents stress-related issues.
- Ensure balanced supply of nutrients.
- Blindness-
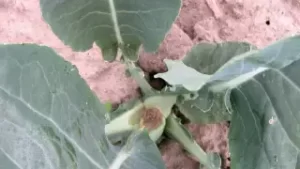
Caused by- When the terminal bud does not develop and eaten by the insects, this condition is called Blindness.
Symptoms-
Affected foliage of these plants grows excessively large, turns dark green and takes leathery texture.
Management-
- Remove all the affected plants from the field.
- Avoid excessive fertilization.
- Avoid water stress and provide proper irrigation to the crop.
- Tip Burn-
Caused by- Inadequate supply of calcium
Symptoms-
It first manifest at the center of the vegetable head. This condition involves the breakdown of tissue, leading brown, papery changes. The inner leaves of the heads are commonly affected, often showing symptoms internally without external signs.
Management-
Foliar application of calcium rich fertilizer can cure tip burn.
- Diamond Back Moth-
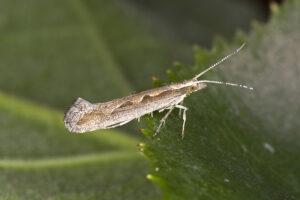
Stage of attack- Diamond Back Moth attacks in cauliflower at multiple stages including seedbed, transplant to first flower, and first flower to maturity.
Symptoms-
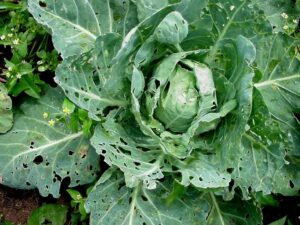
- Young larvae feed on the leaf surface, creating pale patches.
- The mature larvae feed on the leaf tissue, stripping away everything except the veins.
- Larval activity may hinder the proper formation of heads in cauliflower.
- For pupation, the larvae spin silk threads on the underside of leaves, within leaf axils, or at the plant’s growing tips.
- Cabbage and other crucifers may develop deformed or undersized heads when affected.
Management-
- Set up Pheromone trap @3/acre
- Remove and destroy all the affected plant debris from the field and maintain field sanitation.
- Make sure that transplants are free from insects and disease.
- Use overhead irrigation instead of flood irrigation.
- To reduce infestations, practice crop rotation by planting legumes, cucurbits, onions, or garlic in place of crucifers each year, interrupting the moth’s life cycle.
- To avoid peak moth activity, plant your crops early in the season.
- Application of following insecticides-
Chlorantraniliprole 18.5%SC @0.1ml/L of water
Emamectin Benzonate 5%SG @0.5gm/L of water
- Cabbage Head Borer-
Stage of attack- Seedling stage
Symptoms-
- The presence of caterpillar leads to web on leaves, and burrowing into stems, stalks and leaf veins.
- Caterpillars feeds on cabbage head making it unfit to eat.
- Holes in cabbage head.
Management-
Apply Malathion 50 EC @250ml/acre.
- Aphid-
Stage of attack- Vegetative Stage
Symptoms-
This pest commonly attacks cruciferous plants during cold season. Both nymphs and adults insect feed by extracting sap from the plants, which leads to decline in vigor. The excreted honeydew attracts sooty mold, which further reduces photosynthesis.
Management-
- Destroy crop remains after harvest.
- Remove alternate host.
- Introduce natural enemies such as ladybirds, spiders to control the population of aphids.
- Install yellow sticky trap @5/acre
- Spray any one of the following insecticides-
| Insecticide | Dosage |
| Azadirachtin 3000PPM | 5 mili litre per litre of water |
| Dimethoate 30% EC | 2 mili litre per litre of water |
| Malathion 50 EC | 1.5 mili litre per litre of water |
| Quinalphos 25% EC | 1 mili litre per litre of water |
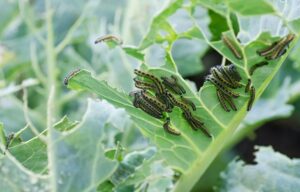
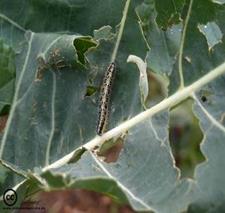
- Cabbage Butterfly-
Stage of attack- Curd formation stage
Symptoms-
Symptoms includes holes in the outer leaves. The damage to the cabbage head becomes clear when the core is sliced, exposing the inner leaves. Caterpillar and their waste are often seen on the plants as well.
Management-
- Collect and destroy the infected plants from the field and maintain field sanitation.
- Apply Malathion 5% @200ml/acre
- Intercrop cauliflower with plants that repel butterflies, such as marigold, mint.
- Avoid planting brassicas in the same area more than once every three or four years.
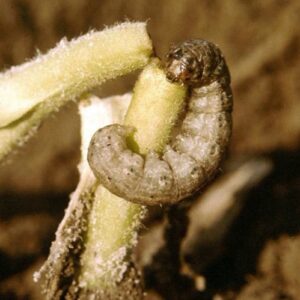
- Cutworms-
Stage of attack- Early growth stages
Symptoms-
- Cutworms make hole into cauliflower heads, mostly feeding during the night, leading to multiple plants in a row wilting or being suddenly severed at the base.
- Feeding damage may be visible on leaves, fruits, or flower buds, often without any pests in sight during daylight hours.
- Cutworms can feed on foliage, fruit, or buds, creating small holes or semicircular notches in the leaves as a result of their feeding.
Management-
- Remove and destroy all the infected plans from the field and maintain field sanitation.
- Application of Deltamethrin 2.5%SC @25gm/30L of water.
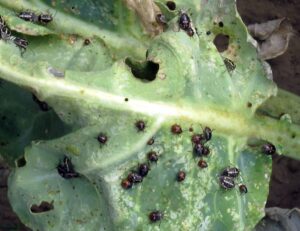
- Painted Bug-
Stage of attack- Seedling stage
Symptoms-
Feeding damage can be seen on leaves, stems, and flowers. Adult pests leave white scars on both sides of the leaves. Thinner leaves may form dry, whitish patches. Affected plants show signs like wilting, yellowing, and leaf drying.
Management-
- Apply Malathion 50EC @1.5ml/L of water
- Remove and destroy the affected plants from the field and maintain field sanitation.
- Deep ploughing can destroy the eggs of the bug.
- Irrigate the crops four weeks after sowing to reduce the attack by painted bug.
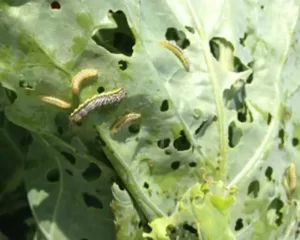
- Tobacco Caterpillar-
Stage of attack- Vegetative and curd formation stage
Symptoms-
- In the early stages, the caterpillars cluster together and scrape off the chlorophyll from the leaf surface, making it look thin and white like paper. As they grow, they become more aggressive feeders, leaving irregular holes in the leaves.
- At first, the leaves develop irregular holes due to caterpillar feeding, and over time, they are reduced to skeletonized remains, with only the veins and petioles left visible.
- The infestation results in severe defoliation, stripping away large sections of the leaves and leaving the plants significantly damaged.
- Fruits that have been infested by pests show irregular holes, rendering them unfit for consumption or sale.
Management-
- Plough the soil to expose and kill pupae.
- Set up light trap @2/acre
- Foliar application of chlorpyriphos 20EC @500ml/acre
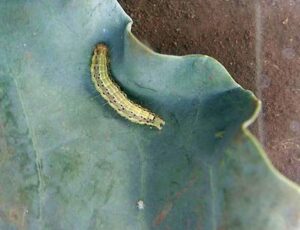
- Cabbage Leaf Webber-
Stage of attack- Vegetative Stage
Symptoms-
- The larvae spin webs as a defense mechanism, offering protection from both predators and the surrounding environment.
- The larvae feed on the leaves, leaving behind holes.
- The larvae’s damage can hinder the growth of the cauliflower plant.
Management-
- Use only pest-free seedlings.
- Foliar application of Cypermethrin or Deltamethrin @30ml/10L of water.
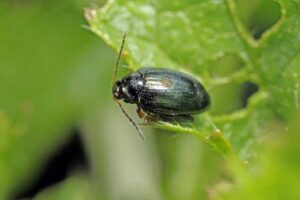
- Flea Beetle-
Stage of attack- Seedling & Early Vegetative Stage
Symptoms-
- Flea beetles create tiny, circular holes in cauliflower leaves, often bordered by light brown scar tissue. These marks are commonly referred to as “shot holes.”
- Adult Flea beetles can leave tiny brown marks on cauliflower heads, which can reduce their market value.
- Heavy flea beetle feeding can severely weaken seedlings, potentially leading to their stunted growth or death.
Management-
- Use row covers to prevent flea beetles from jumping onto the leaves.
- Use sticky traps around the host plants to attract flea beetles.
- Clean and remove affected plants from the field and maintain field sanitation.
- Application of insecticide such as Cypermethrin 25 EC @0.5ml/L of water, Azadirachtin 300 ppm @2-3ml/L of water.
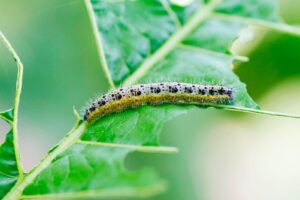
- Cabbage Worm-
Stage of attack- Vegetative and Heading stage
Symptoms-
- The most noticeable sign is the presence of irregular holes in the leaves of cauliflower plants. Cabbage worms feed on the leaf tissue, leaving large, jagged holes.
- You might find small green or brown pellets (frass) on the leaves. This is the excrement left behind by the worms.
- In severe infestations, cabbage worms can eat so much leaf tissue that only the veins of the leaves remain, leaving a skeleton-like appearance.
- The worms can also feed on the developing heads of cauliflower, causing deformities and damage, making the heads unmarketable.
- Continuous feeding by cabbage worms can weaken the plant, causing the leaves to turn yellow and eventually die.
Management-
- Inspect your cauliflower plants regularly and manually remove any cabbage worms you find. Be sure to check the undersides of leaves where worms tend to hide.
- Neem oil acts as an insect repellent and disrupts the worms’ growth and feeding. Spray neem oil on both sides of the leaves every few days until the infestation is controlled.
- Introduce natural predators like parasitic wasps (e.g., Trichogramma) or green lacewings, which feed on cabbage worm larvae and eggs.
- Avoid planting cauliflower or other brassicas (like broccoli, kale, or cabbage) in the same spot year after year to break the life cycle of cabbage worms.
- Remove plant debris and weeds where cabbage worms or butterflies may hide or lay eggs.
- Mustard Aphid-
Stage of attack- Reproductive Stage
Symptoms-
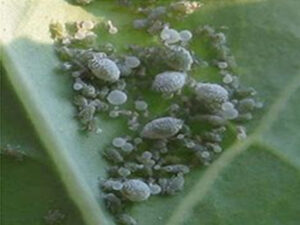
- Both nymphs and adult aphids feed on the plant by extracting sap from the leaves, buds, and pods.
- Infested leaves may start to curl, and in severe cases, the plants can wither and eventually die.
- The plants stay stunted, and sooty mold develops on the honeydew secreted by the insects.
Management-
- Use tolerant varieties.
- Remove and destroy the affected plants from the field to maintain field sanitation.
- Set up yellow sticky trap to attract aphids.
- Introduce natural enemies in the field such as Lacewings, wasps, beetles,
- Application of Dimethoate 30% EC @200-300ml/acre.
- Damping Off-
Causal Organism- Rhizoctonia solani
Symptoms-
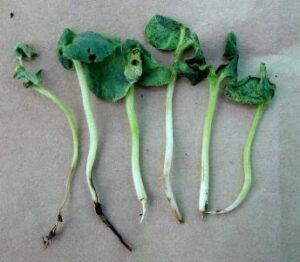
- Infected plants may germinate and appear healthy initially, but after a few days, they develop a water-soaked, mushy appearance, collapse at the base, and eventually die.
- Stems exhibit signs of decay near the soil line, affecting the roots.
- Seedlings show signs of slowed or limited development.
- The lower surface of the leaves shows small, purplish-brown spots.
- The upper leaf surface develops small, angular, pale yellow spots, while the underside shows a downy growth. These spots eventually merge, leading to premature leaf shriveling and drying.
Favorable Conditions-
High humidity level, cool soil, planting too deeply favors the growth of fungus.
Management-
- Avoid overwatering to the plants.
- Apply Metalaxyl 8% + Mancozeb 64% @200-300gm/acre.
- Remove and destroy the affected plants from the field and maintain field sanitation.
- Club Root of Crucifers-
Causal Organism- Plasmodiophera brassiacae
Symptoms-
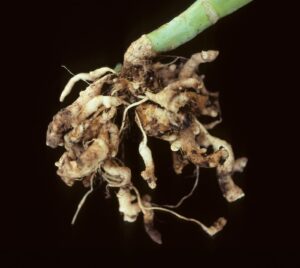
- Clubroot is most commonly identified by the abnormal enlargement and deformation of the roots, giving them a club-like appearance. At first, the galls are solid and white, but over time, they darken to brown and begin to decompose.
- Due to reduced water and nutrient uptake caused by the galls, plants may appear wilted in the daytime but regain their strength by nighttime.
- Plants may become stunted and produce fewer, smaller leaves.
- As the plant deteriorates, older leaves can become yellow and die.
- The leaves of the plants could turn purplish in color.
Favorable Conditions-
Soil temperature between 20-24oC and pH less than 6.5 favors the growth of this fungus.
Management-
- Rotate crops with cereal crops or other non-host crops.
- To reduce the risk of clubroot and stop spores from germinating, increase the soil pH above 7.2 by using a combination of hydrated lime and crushed limestone.
- Remove and destroy the affected plants from the field and maintain field sanitation.
- Seed treatment with Captan or Thiram @4gm/kg of seeds.
- Drench the soil with copper oxychloride 0.25% @2-3 L plant.
- Alternaria Leaf Spot-
Causal Organism- Alternaria brassicae
Symptoms-
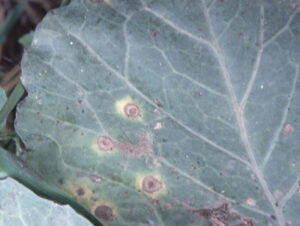
- Leaf symptoms present as round brown patches, encircled by rings, and are often highlighted by a yellowish halo. The centers of these patches may crack, and they generally affect the older leaves first.
- With time, the disease spreads, causing the spots to join together and result in extensive areas of dead tissue on the leaves.
Favorable Conditions-
High humidity, combined with a soil temperature of 28°C, promotes the growth of the fungus.
Management-
- Use fungicides like Mancozeb at 2 grams per liter of water, or Azoxystrobin 23% SC at 300 ml per acre.
- Overhead irrigation should be avoided.
- Remove and dispose of the infected plants from the field.
- Black Rot-
Causal Organism- Xanthomonas campestris
Symptoms-
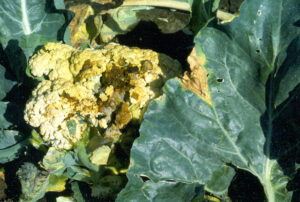
- Irregular, dull yellow spots form along the leaf edges, gradually developing into V-shaped areas with a yellow border and a brown or dead center.
- Infected cauliflower heads may develop blackened curds.
- The inner stem tissue may discolor, turning brown or black.
- Although there may be no visible symptoms on the above-ground parts of root crops, blackened veins can form on the roots.
Favorable Conditions-
Warm temperature between 24-35oC, high humidity favors the growth of this disease.
Management-
- Apply a 0.5% Formaldehyde solution to drench the soil.
- Use bleaching powder to manage the disease.
- Remove and eliminate infected plants from the field.
- Apply fungicides like Mancozeb and Ziram 27% SC at rates of 2.5 grams per liter of water and 1 milliliter per liter of water, respectively.
- Downy Mildew-
Causal Organism- Hyaloperonospora parasitica
Symptoms-
- The underside of the leaves displays whitish, fuzzy patches, while the upper surface shows yellowish or light green spots. As the disease advances, these spots grow larger and turn into necrotic areas. Older leaves may wither and drop off.
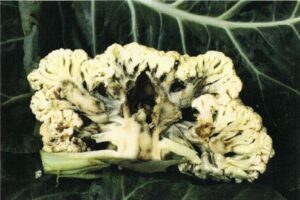
- The curds may show a pale brown to gray surface, with grayish or black spots forming on the stem. Inside the curd, the color may darken to brown, black, or gray.
- Dark brown, sunken lesions or streaks may be visible on the stems.
Favorable Conditions-
Cool temperature of 15-20oC, high humidity above 85% favors the growth of fungus.
Management-
- Use hot water treatment before sowing.
- Always use disease resistance variety.
- Remove and destroy all the affected plants from the field.
- Spray Metalaxyl 35% WS on leaves at a rate of 1.5 grams per liter of water.
- Powdery Mildew-
Causal Organism- Erysiphe cruciferarum
Symptoms-
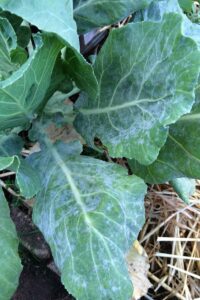
Affected leaves show curling and distortion, and flowers on the panicle become unable to open, eventually dropping off without producing fruit. Mildew results in cracking of the skin on developing fruits, which subsequently drop from the plant. Infected seedlings eventually die. Notably, mature leaves and fruits are resistant to mildew and are not prone to the disease.
Favorable Conditions-
High humidity, Temperature of 15-26oC, favors the growth of this disease.
Management-
- Apply Fungicide such as Wettable sulphur or potassium bicarbondate to overcome this disease.
- Prune the extra leaves periodically.
- Rotate crops with non-cruciferous crops
- Plant disease free transplants
- Control weeds population.
- Remove and destroy affected plants from the field and maintain field sanitation.
- White Rust-
Causal Organism- Alubugo candidans
Symptoms-
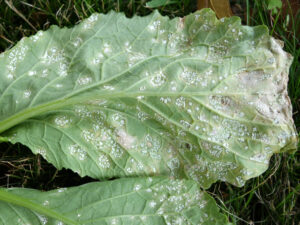
White rust appears as small white blisters on the undersides of infected leaves. These blisters can grow and combine, creating larger, irregular lesions packed with white spores. On the upper surface, infected leaves often show a distinct mosaic pattern. In some instances, the disease may lead to root swellings that resemble club-shaped growths.
Favorable Conditions-
This fungus thrives in cool temperatures, heavy dew, and high humidity.
Management-
- Implement crop rotation using non-cruciferous crops.
- Manage weed populations.
- Clear debris after harvesting.
- Apply Mancozeb at 0.25% regularly.
- Sclerotinia White Mold-
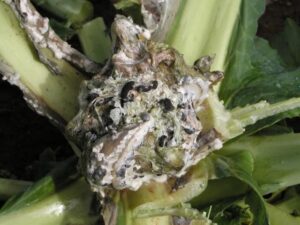
Causal Organism- Sclerotinia sclerotiorum
Symptoms-
- Wilting and yellowing of lower leaves, a limp, pale appearance, and cottony fungal growth on the plant’s base.
- Black structures, known as sclerotia, may be visible within the cottony growth.
- These areas may eventually be covered by fluffy white mold.
Favorable Conditions-
Cool wet conditions with moderate temperature, high relative humidity favors the growth of this fungus.
Management-
- Avoid overwatering
- Improve air circulation
- Rotate with a non-host crop, such as corn.
- Remove withered or dead leaves and flowers, along with any plant debris.
- Application of Carbendazim @2gm/L of water
Harvesting-
Harvest cauliflower when the curds are firm, compact, uniformly colored, and 6-8 inches in diameter. If the curds begin to separate, it’s overripe and should be harvest immediately.
Use a sharp knife or pruning shears to cut the stem 3-4 inches below the crown, leaving a few leaves on the head for protection and freshness.
Avoid snapping or twisting the curds to prevent damage. Store harvested cauliflower in a cool place, such as the shade or a refrigerator.
After harvesting, cut the remaining stem at the soil line and compost it. The leaves can be used like kale or collard greens, and the stems can be added to vegetable stock.
Yield-
Yield depends on various factors such as variety used, climatic conditions, soil conditions, agronomy practices, the average yield of cauliflowers varies between 90-120 quintal per acre.